Knitting Patterns Are you looking for ways to create unique, one-of-a-kind creations? If so, you’re in luck! Knitting is a hobby that allows crafters to customize their projects and create something truly special. Not only is knitting an enjoyable activity, but it also comes with a variety of free patterns that can help experienced and novice knitters alike make beautiful items.
Easy Knits from Knitting Daily: 7 Free Easy Knitting Patterns
Green Tea Raglan
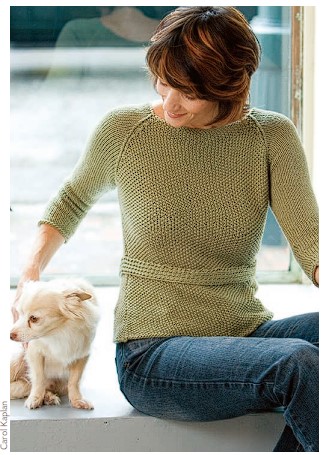
a standout—and its simple design make it suitable for
beginners or those wanting a no-fuss project. The fresh,
stylish result is so stunning, however, that no one will
ever know if it was your first sweater or your fortieth.
Finished Size: 34½ (38½, 42½, 46½)” bust
circumference. Sweater shown measures 34½”.
Yarn: Classic Elite Bam Boo (100% bamboo; 77 yd [70
m]/50 g): #4915 bamboo leaf, 11 (13, 15, 16) balls.
Needles: Sizes 6 (4 mm) and 7 (4.5 mm). Adjust needle
size if necessary to obtain the correct gauge.
Notions: Tapestry needle.
Gauge: 18 sts and 29 rows = 4″ in seed st on larger
needles; 18 sts and 26 rows = 4″ in St st on smaller
needles.
Skill Level: Beginner.
Stitch Guide:
Bind of pwise (bind off purlwise): Purl all stitches as you
work the bind-off row instead of knitting them.
Type of Knitting
Worked back and forth in rows
Techniques Used
Cast on
Knit, purl
Simple ribbing
Seed Stitch in rows (only knit and purl); see Stitch
Guide
Stockinette stitch in rows (knit on right side; purl on
wrong side)
Decrease stitch (k2tog; see Glossary)
Increase stitch (Knitter’s choice: either make 1 or
k1f&B; see Glossary)
Bind off purlwise (see Stitch Guide)
Simple seams
Weave in loose ends
Blocking
Stitch Guide:
Bind of pwise (bind off purlwise): Purl all stitches as you
work the bind-off row instead of knitting them.
Seed Stitch: (even number of sts)
Row 1: (RS) *K1, p1; rep from * to end.
Row 2: (WS) *P1, k1; rep from * to end.
Rep Rows 1 and 2 for patt.
Seed Stitch: (odd number of sts)
Row 1: *K1, p1; rep from * to last st, k1.
Rep Row 1 for patt.
NOTE
The front and back of this pullover are worked identically. The
raglan sleeves are sewn to the body and a decorative belt is
added.
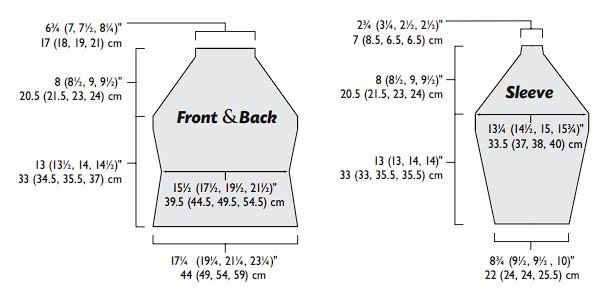
Front and Back (make 2)
With larger needles, CO 78 (87, 96, 105) sts. Knit 1 WS row.
Next row: (RS) K1 (selvedge st), work in seed st (see Stitch
Guide) to last st, k1 (selvedge st). Cont in patt, working selvedges
in St st (knit on RS; purl on WS) and body in seed st, and dec
1 st each end of needle every 10th (12th, 14th, 16th) row 4
times—70 (79, 88, 97) sts rem; piece should measure about
5¾ (7, 8, 9)” from CO. Cont in patt, inc 1 st each end of needle
every 12th (12th, 10th, 10th) row 4 times—78 (87, 96, 105)
sts. Work even in patt, if necessary for your size, until piece
measures 13 (13½, 14, 14½)” from CO, ending with a WS row.
Shape raglan: Dec 1 st each end of needle every RS row 24
(28, 31, 34) times—30 (31, 34, 37) sts rem. Work even in patt,
if necessary for your size, until raglan measures 8 (8½, 9, 9½)”
(measured vertically, not along the angle), ending with a RS row.
Knit 1 WS row. BO all sts pwise.
Sleeves
With smaller needles, CO 40 (43, 43, 45) sts. Knit 1 WS row.
Work in St st and inc 1 st each end of needle every 6th row 6 (6,
6, 13) times, then every 8th row 4 (5, 6, 0) times—60 (65, 67, 71)
sts. Work even in St st until piece measures 13 (13, 14, 14)” from
CO, ending with a WS row. Shape raglan: Dec 1 st each end of
needle every RS row 24 (25, 28, 30) times—12 (15, 11, 11) sts
rem. Work even in St st until raglan measures 8 (8½, 9, 9½)”,
ending with a RS row. Knit 1 WS row. BO all sts pwise.
Finishing
Sew raglan edges of sleeves to body, creating a clean edge at
neckline. Sew sleeve and side seams. Belt: With larger needles,
CO 9 sts.
Row 1: (RS) *K1, p1; rep from * to last st, k1.
Row 2: Purl.
Rep Rows 1 and 2 until piece measures 30 (34, 38, 42)” for
sewn-on belt or to desired length for tied belt. BO all sts. Pin belt
at waist and sew loosely to sweater. Weave in loose ends. Block
according to directions on yarn label. –
CATHY PAYSON lives and knits in South Boston, Massachusetts.
Knitting Needle Knitting Bag
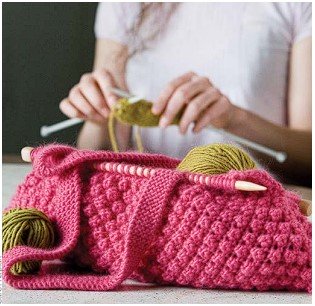
Finished Size: About 18¾” (47.5 cm) wide and 9″
(23 cm) tall, excluding handles.
Yarn: Chunky weight (#5 Bulky). Shown here: Nashua
Handknits Creative Focus Chunky (75% wool, 25%
alpaca; 110 yd [101 m]/100 g): #1940 dried rose, 3
balls.
Needles: Bag—size 10½ (6.5 mm). Handles—size 9
(5.5 mm). Adjust needle size if necessary to obtain the
correct gauge.
Notions: Tapestry needle; size 15 (10 mm) wooden
needles; superglue.
Gauge: 17 stitches and 19 rows = 4″ (10 cm) in
pattern stitch on larger needles.
Skill Level: Beginner.
Pam Allen indulged her fondness for the berry stitch in
this quick-and-easy knitting bag whose cigar shape was
inspired by a bag she saw in a catalog. For the front and
back, she knitted two slightly shaped rectangles and
seamed them along the bottom and partway up the sides.
Rather than binding off, she placed the live stitches on
wooden knitting needles, squished them together to form
soft gathers, and applied a little superglue. Garter-stitch
handles sewn to the front and back are all that’s needed to
finish the bag. This particular bag isn’t lined, but it would
be an easy matter to use the front and back as pattern
pieces and add a cheery print lining to prevent needles
from poking through.
Type of Knitting
Worked back and forth in rows
Techniques Used
Cast on
Knit, purl
p3tog (see Stitch Guide)
Garter stitch (knit every row)
Bind off
Weave in loose ends
Steam block
Simple seams
Stitch Guide:
p3tog: Insert needle as though to purl through next 3 stitches on
left-hand needle. Wrap yarn and pull through all three stitches at
once—3 stitches decreased to 1.
Back
With larger needles, CO 80 sts.
Row 1: (WS) K2, *(k1, p1, k1) in next st, p3tog; rep from * to
last 2 sts, k2.
Row 2: Purl.
Row 3: K2, *p3tog, (k1, p1, k1) in next st; rep from * to last 2
sts, k2.
Row 4: Purl.
Rep Rows 1–4 until piece measures 9″ (23 cm) from CO, ending
with Row 4 of patt. Dec row: (WS) K2, *k1, p3tog; rep from
- to last 2 sts, k2—42 sts rem. Loosely knit 1 row. With size 15
wooden needles, purl 1 row. Leave sts on needle.
Front
CO 80 sts and work as for back.
Handles (make 2)
With smaller needles, CO 6 sts. Work in garter st (knit every row)
until piece measures 21″ (53.5 cm) from CO. BO all sts.
Finishing
Gently steam-press pieces. With yarn threaded on a tapestry
needle, sew bottom seam. Beg at bottom edge, sew side seams
for 5″ (12.5 cm). Spread sts evenly along wooden needle from
knob end to 1½” (3.8 cm) from tip. Use superglue to secure last
few sts at pointed end. Sew handles to bag 10 sts in from each
end. –
PAM ALLEN is creative director of Classic Elite Yarns and
former editor in chief of Interweave Knits. She’s the author of
Knittng for Dummies (For Dummies, 2002) and Scarf Style, the
first book in the Interweave Style series, and coauthor of Wrap
Style, Lace Style, Bag Style, and Color Style.
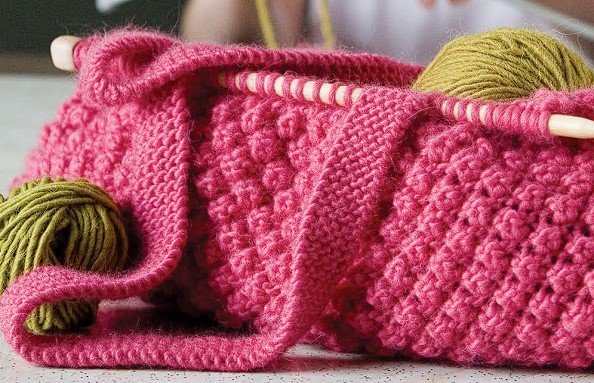
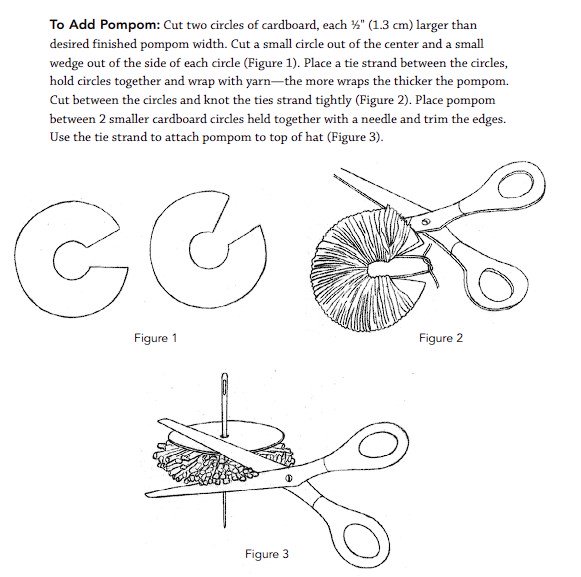
Easy Knitted Hat
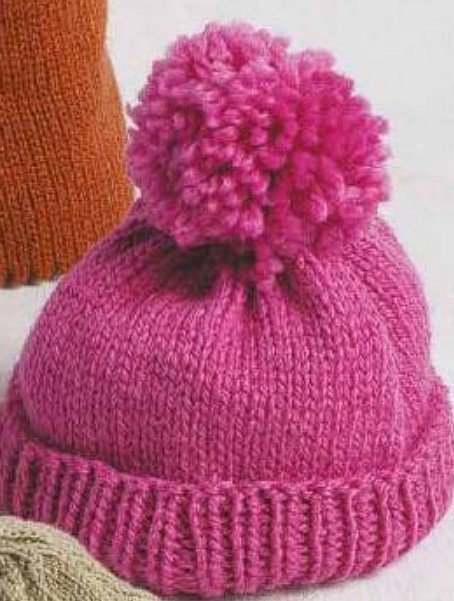
Type of Knitting
Worked in the round on double
pointed needles or circular
needles
Techniques Used
Cast on
Knitting in the round
Simple ribbing
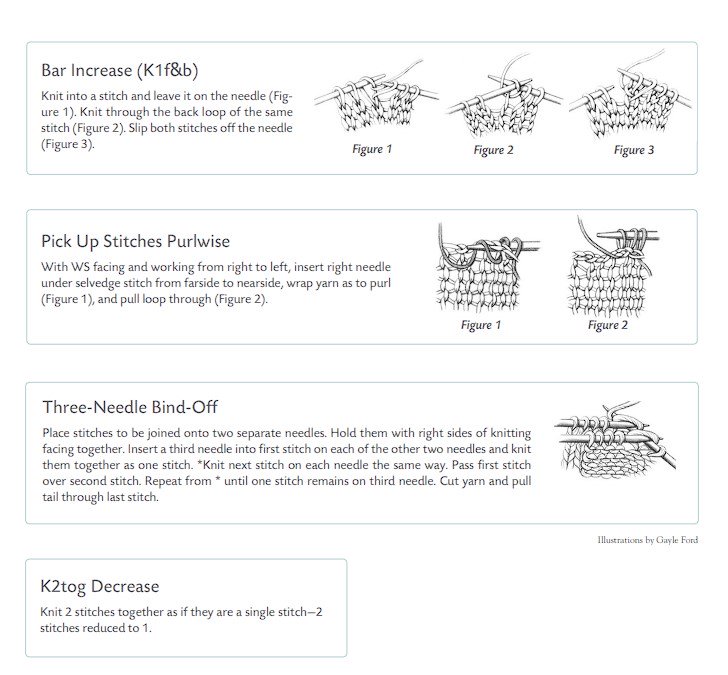
K2tog decreases (see Glossary)
Bind off
Weave in loose ends
Steam block or wet block
Finished Head Circumference: 21″
Yarn: Cascade 220 Superwash (100% superwash wool, 220
yds [201 m]/100 g); #914A, Tahitian Rose, 1 skein
Needles: Set of 4 (or 5) double-pointed needles (dpn), or
16-inch circular needle, in sizes 6 U.S. (4 mm)and 7 U.S. (4.5
mm), or size necessary to obtain gauge
Gauge: 20 sts = 4 inches on larger needles
Notions: Marker (m), tapestry needle
Skill Level: Beginner
Hat
Using smaller needles, cast on 104 sts. If using dpn, arrange
sts evenly on 3 (or 4) dpn. Place marker (pm) and join, being
careful not to twist sts. Work k1, p1 rib for 2½ inches.
Crown
Change to larger needles. Work in St st until piece measures
8¼” from base of ribbing.
Work one round, decreasing 8 stitches evenly spaced, as
Work one round, decreasing 8 stitches evenly spaced,
as follows: *K 6, k2tog; rep from *—96 sts.
SHAPE TOP
Dec Rnd 1: *K2 k2tog; rep from *—72 sts.
Work 1 rnd even.
Dec Rnd 2: *K1, k2tog; rep from *—48 sts.
Work 1 rnd even.
Dec Rnds 3, 4, and 5: *K2tog; rep from *—6 sts.
Finishing
Break yarn, pull tail through sts, pull tight, and
secure to inside. Weave in loose ends. Block.
Ribby Slipper Socks
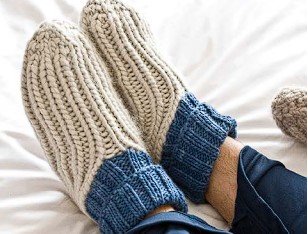
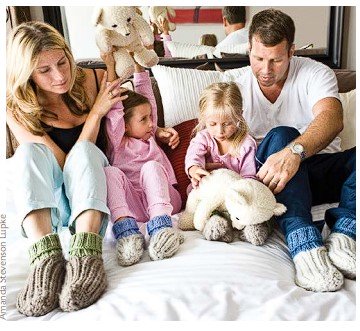
Finished Size: 4¾ (4¾, 4¾, 6½, 6½)” foot circumference
and 6 (7½, 9, 10½, 12)” from tip of toe to back of heel. To fit
toddler (child, small woman, large woman, man).
Yarn: Blue Sky Alpacas Bulky (50% alpaca,
50% wool; 45 yd [41 m]/100 g): MC, 1 (1, 2, 2, 2)
ball(s). Blue Sky Alpacas Worsted Hand Dyes (50%
alpaca, 50% wool; 100 yd [91 m]/100 g): CC, 1 ball
(all sizes).
Shown in colors as foll:
Toddler: MC: #1003 porcupine (light khaki);
CC: #2014 olive
Child: MC: #1002 silver mink (light beige);
CC: #2007 light blue
Small woman (not shown): MC: #1003 porcupine
(light khaki); CC: #2001 dungaree blue
Large woman: MC: #1001 lynx (medium khaki);
CC: #2014 olive
Man: MC: #1002 silver mink (light beige);
CC: #2001 dungaree blue
Needles: Sizes 11 (8 mm) and 8 (5 mm): set of 4 doublepointed (dpn). Adjust needle size if necessary to obtain the
correct gauge.
Notions: Tapestry needle; stitch marker (m).
Gauge: 15 sts and 15 rnds = 4″ in 1×1 rib with MC on
larger needles, relaxed; 14 sts and 23 rnds = 4″ in 2×2 rib
with CC on smaller needles, relaxed.
Skill Level: Easy.
Stitch Guide:
Bind off in ribbing: Bind off as you usually would, except
knit the knits and purl the purls as you work along the
row.
Type of Knitting
Worked in the round on double-pointed needles (dpns)
Techniques Used
Cast on
Knit, purl
Working on double-pointed needles (dpns) in the round
K1f&b increase (see Glossary)
Simple ribbing
3-needle bind off (see Glossary)
Pick up and knit stitches (see Glossary)
Bind off in ribbing (see Stitch Guide)
Weave in loose ends.
Slipper
With MC and larger needles, CO 12 sts. Divide sts
evenly onto 3 dpn, place maker (pm) to indicate beg of
rnd, and join in the rnd.
Rnd 1: Knit.
Rnd 2: *K1, k1f&b; rep from * around—18 sts.
Rnd 3: Knit.
Sizes large woman and man only:
Rnd 4: *K2, k1f&b; rep from * around—24 sts.
Rnd 5: Knit.
All sizes:
Rnd 6: *K1, p1; rep from * around. Rep Rnd 6 until
piece measures 3 (4, 5, 6, 7)” from toe tip. Leg
opening: Working back and forth in rows, cont in
1×1 rib for 3 (3½, 4, 4½, 5)” more—piece measures 6
(7½, 9, 10½, 12)” from toe. Join back of heel: Place
9 (9, 9, 12, 12) sts onto each of 2 dpn. Holding these
dpn parallel with RS tog, use the three-needle BO (see
Glossary) to join back of heel. Cuff: With smaller dpn,
CC, and RS facing, beg at top of heel seam, pick up and
knit 36 (36, 40, 44, 48) sts around leg opening. Divide
sts onto 3 dpn and join in the rnd. Work in 2×2 rib for
4 (4, 5, 5, 5)”. BO all sts loosely in rib. Weave in loose
ends. With MC threaded on a tapestry needle, close
any rem hole at toe. –

Super-Simple Wrap Jacket
What could be simpler? Five easy pieces, done in stockinette and garter stitch with minimal shaping.
This is a perfect “first sweater” for a beginner, or a great knit for anyone who wants something simple
for travel knitting, TV knitting—or hockey mom (or dad!) knitting! And the best part is that when the
sweater is finished, you have a wonderful casual, comfy cardigan to wear (and show off!) on weekends,
to yoga, or to backyard barbecues when the evenings turn cool.

- Type of Knitting
- Worked back and forth in rows
- Techniques Used
- Cast on
- Knit, purl
- Stockinette stitch (knit on right side; purl
- on wrong side)
- Decrease stitch (k2tog; see Glossary)
- Garter stitch (knit every row)
- Bind off
- Sew simple seams
- Weave in loose ends
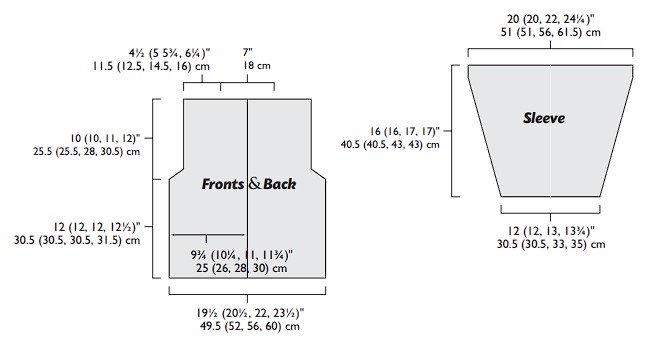
Finished Size: 39 (41, 44, 47)” (99 [104, 112, 119.5] cm)
bust/chest circumference. Sweater shown measures 41″
(104 cm).
Yarn: S. Charles Collezione Victoria (60% cotton, 40%
viscose; 72 yd [66 m]/50 g): #2 ecru, 14 (15, 17, 18) balls.
Yarn distributed by Tahki Stacy Charles.
Needles: Size 7 (4.5 mm). Adjust needle size if necessary to
obtain the correct gauge.
Notions: Markers (m); tapestry needle.
Gauge: 18½ sts and 25 rows = 4″ (10 cm) in St st.
Skill Level: Beginner.
Back
CO 90 (94, 102, 108) sts. Work St st until piece measures 12 (12,
12, 12½)” (30.5 [30.5, 30.5, 31.5] cm) from beg, ending with a
WS row. Shape armholes: Beg with the next RS row, dec 1 st
each end of needle every row 8 (8, 8, 9) times—74 (78, 86, 90)
sts rem. Cont even until armholes measure 10 (10, 11, 12)” (25.5
[25.5, 28, 30.5] cm). Mark 21st (23rd, 27th, 29th) sts in from
each armhole edge for shoulder seam placement. BO all sts.
Right Front
CO 45 (47, 51, 54) sts. Work St st until piece measures 12 (12,
12, 12½)” (30.5 [30.5, 30.5, 31.5] cm) from beg, ending with a
RS row. Shape armhole: On next row (WS), dec 1 st at beg of
row, work to end—1 st dec’d. On next row (RS), work to last 2
sts, dec 1 st—1 st dec’d. Dec 1 st at armhole edge in this manner
every row 6 (6, 6, 7) more times—37 (39, 43, 45) sts rem. Cont
even until armhole measures 10 (10, 11, 12)” (25.5 [25.5, 28,
30.5] cm). Mark 21st (23rd, 27th, 29th) st in from armhole edge
for shoulder seam placement. BO all sts.
Left Front
CO 45 (47, 51, 54) sts. Work St st until piece measures 12 (12,
12, 12½)” (30.5 [30.5, 30.5, 31.5] cm) from beg, ending with a
WS row. Shape armhole: On next row (RS), dec 1 st at beg of
row, work to end—1 st dec’d. On next row (WS), work to last 2
sts, dec 1 st—1 st dec’d. Dec 1 st at armhole edge in this manner
every row 6 (6, 6, 7) more times—37 (39, 43, 45) sts rem. Cont
even until armhole measures 10 (10, 11, 12)” (25.5 [25.5, 28,
30.5] cm). Mark 21st (23rd, 27th, 29th) st from armhole edge
for shoulder seam placement. BO all sts.
Sleeves
CO 56 (56, 60, 64) sts. Work St st, inc 1 st each end of needle
every 5 (5, 4, 4) rows 18 (18, 21, 24) times—92 (92, 102, 112)
sts. Work even until piece measures 16 (16, 17, 17)” (40.5 [40.5,
43, 43] cm) from beg. BO all sts.
Finishing
With yarn threaded on a tapestry needle, sew shoulder seams
from armhole edge to marked sts, leaving 32 sts across back
neck and 16 sts at center front edge unsewn. Sew sleeves into
armholes. Sew sleeve and side seams. Belt: CO 9 sts. Work
garter st (knit every row) until piece measures 56 (56, 60, 60)”
(142 [142, 152.5, 152.5] cm) from beg. BO all sts. Weave in
loose ends.
Rainbow Cowl
- Type of Knitting
- Worked back and forth in rows.
- Techniques Used
- Cast on
- Garter stitch (knit every row)
- Bind off
- Mattress stitch (see page 15)
- Steam block or wet block
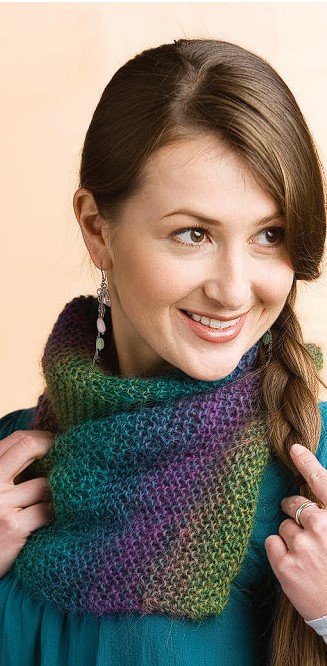
Size 16″ wide (before twisting) and 23″ long (before seaming)
Yarn Nashua Handknits Geologie (37% acrylic, 33% mohair,
30% wool; 142 yd [130 m]/50 g):
• #0389 shale, 2 balls
Yarn distributed by Westminster Fibers
Gauge 13 sts and 28 rows = 4″ in garter st
Tools
• Size 10 (6 mm) needles
• Yarn needle
COWL
CO 52 sts. Work in garter st (knit every row) until piece measures 23″ from CO. BO all sts.
FINISHING
Following diagram, lay piece flat. Twist once as shown. Fold and
seam side edges with horizontal mattress st (see the next page),
sewing only half the depth of the piece. Weave in ends.
Horizontal Mattress Stitch
Step 1: Lay the two pieces next to each other
(with one above the other), right sides facing
up, edges side by side and lining up stitch for
stitch. Thread a tapestry needle with a length
of yarn three times as long as the area you are
sewing.
Step 2: To start the seam, *insert the needle from
back to front into the center of the V of the
stitch just below the bound-off edge of the bottom piece. Insert the needle under the V (the
two strands) of the knit stitch on the top piece,
then return to the stitch used in the first piece
and insert the needle into the center of the
same V from front to back. Move to the next V
on the bottom piece and repeat from *.
Step 3: Pull the yarn gently as you repeat this process, so the seam is nearly invisible; it should
look like another row of stitches. When you
reach the end of the bound-off edges, pull
gently on your seaming yarn and weave it into
the knitted work for a few inches.
Easy-Peasy Fingerless Mitts
Type of Knitting
Worked back and forth in rows
Techniques Used
Cast on
Stockinette stitch (knit on right
side; purl on wrong side)
Simple ribbing
Bind off
Weave in loose ends
Mattress stitch (see page 15)
Steam block or wet block
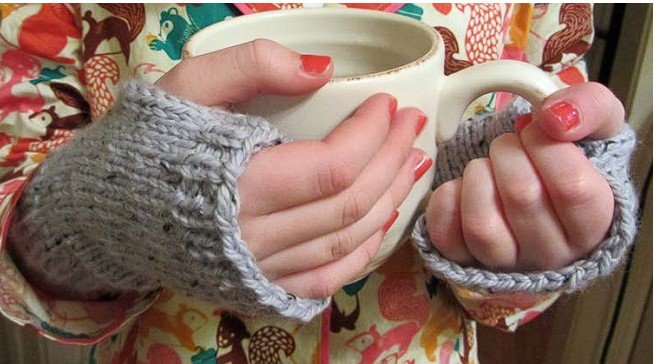
If you can knit and purl, you can make these
easy fingerless mitts! They’re basically knitted
squares with some ribbing at the tops and
bottoms!
Finished Size: 3¼” wide by 6½” tall
Yarn: Alpaca with a Twist Highlander (45 %
Merino, 45% Alpaca, 10% Microfiber; 145 yds
[133 m]/100 g), #2010, wild pansy, 1 skein.
Needles: Size 7 (4.5 mm) and 8 (5 mm) straight
or circular needles. Adjust needle size if necessary
to obtain the correct gauge.
Notions: Tapestry needle
Gauge: 16 sts and 24 rows = 4 inches
Skill Level: Beginner
Mitt (Make 2)
Using smaller needles, cast on 32 sts.
Knit in k1/p1 rib for 2″.
Change to larger needles and knit in stockinette for 4 to 5 inches,
depending on length of your hand.
Switch to smaller needles and knit 4 rows in k1/p1 rib.
Bind off in pattern.
Finishing
Starting from the bottom, use the mattress stitch to seam the sides together
for 3 inches. Leave 1½ inches open for a thumb hole, and seam to top.
Weave in ends and block.
Love love all of these…but was interested in the bear with sweater pattern that was shown…😟was not shared however. Please advise if it’s pattern us available. Looking for a small sweater pattern to put on Easter bunnies I’ve bought. 😊Thank you.